- Introduction
- Subscribing to the Online Data Management System
- Logging In
- Purchasing the Reading Record App Content
- Adding Classes
- Deleting Classes
- Adding Students
- Deleting Students
- Inactive Students
- Practicing
- Beginning an Assessment
- Ending an Assessment
- Assessment Summary Report
- Selecting a Book
- Reading the Introduction
- Coding a Reading Record
- Scoring and Analyzing
- Assessment Report
- Continuing an Unfinished Assessment
- Syncing to the ODMS
- Changing Coding Indicator Preferences
Introduction
Welcome to the Fountas & Pinnell Classroom™ Reading Record App. With this app and an iPad stylus (many stylus types are available online), you can purchase and code reading records for Fountas & Pinnell Classroom™ (FPC). You can also analyze and score the reading records and the comprehension conversations as you assess students to determine their instructional and independent reading levels. Once you have collected the student reading data, you can import them wirelessly into the Fountas & Pinnell Classroom™ Online Data Management System (ODMS) to help you monitor and create reports on all students in a class, school, or district.
We recommend that you read this entire Help section before purchasing reading records and trying the app. We also recommend watching the video tutorial here.
If you had a previous version of the app, you may need to familiarize yourself with the new coding functions, which rely on gestures rather than on buttons for marking the various reader behaviors. This new approach is faster, especially once you have had a bit of practice.
Subscribing to the Online Data Management System
You must subscribe to the Online Data Management System (ODMS) to log into and use this app. The data on the ODMS does not disappear after a year as it does on the app (on July 1st in the Northern Hemisphere and January 1st in the Southern Hemisphere), and the ODMS allows for various levels of reporting for teachers and for school and district administrators. You use your ODMS ID and password to log into the app.
Once you have subscribed to the ODMS, you will set up your classes there. You can then log into the app and wirelessly sync to move the class data over to the iPad.
To subscribe to the FPC GR ODMS, please visit FPC GR ODMS.
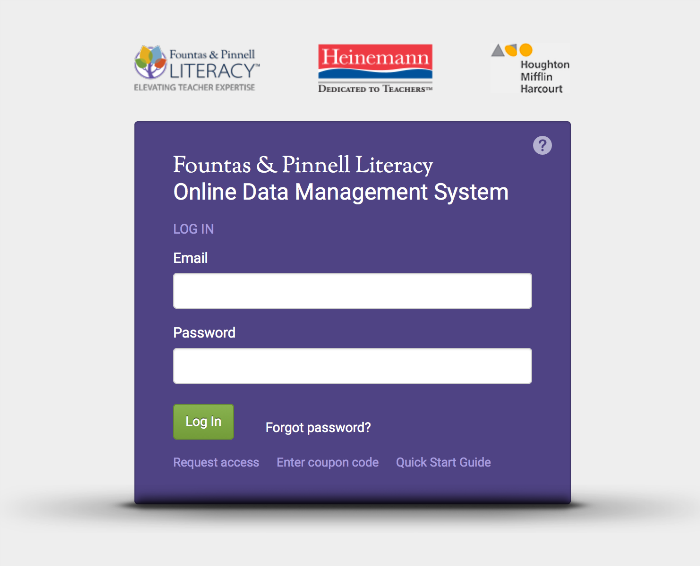
Logging In
You will use your login ID and password from the ODMS to log into the app. Doing so links this app to your online account and automatically imports your classes and students into the app from the ODMS. You can also export your assessment data from the app to your ODMS account.
If you have forgotten your username or password for the ODMS, you will need to go to the login page for the ODMS to retrieve them.
Your classes will automatically load into the ODMS upon your first login on the app, so please make sure you have a good wireless connection to the Internet when you first log in to the app. (You will not need to maintain a wireless connection later, during assessments.)
Please note that only one user may use the app on any single iPad. Once a second user logs in, the first user's data will be deleted.

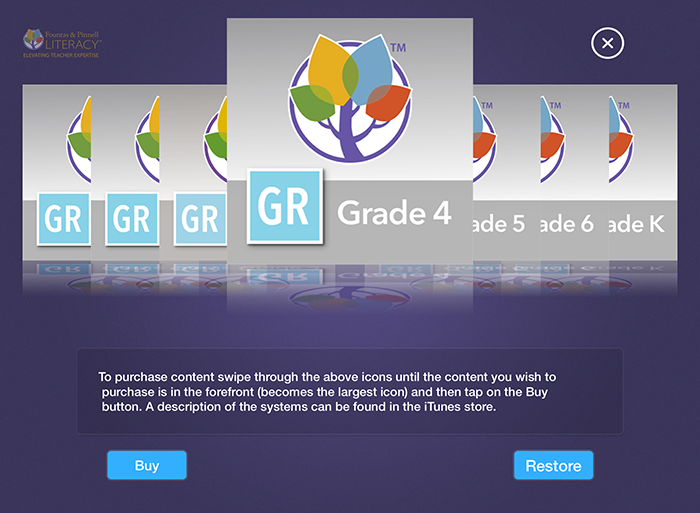
Purchasing the Reading Record App Content
To purchase the reading record app content for Fountas & Pinnell Classroom™, log in to the app and then, from the Student Profile Screen, tap on the shopping cart icon on the upper right. You will be taken to a screen that shows all available in-app purchase options: GRK, GR1, GR2, GR3, GR4, GR5, and GR6. To select, swipe across the images until the product you want is in the foreground. Then tap on Buy at the bottom of the screen and follow the prompts. When you have made your purchase(s), tap on Close in the upper right.
If your administrator has purchased content for you through the Institutional Purchase (bulk purchase) option and you have received an email telling you that there is content available and you already have the app shell from iTunes, select the shopping cart icon in the upper right hand corner of the application to open the in-app purchase shopping cart page. You don’t need to tap on any buttons. Rather, when the “loading” indicator disappears, your new content will be loaded and available to you.
Adding Classes
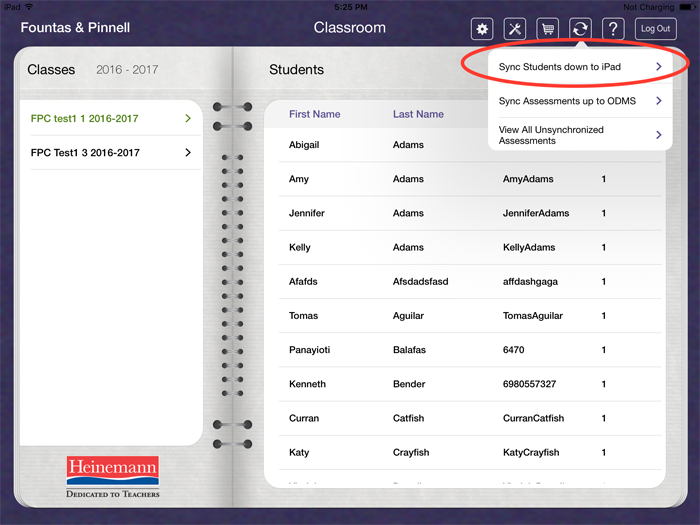
You must add classes from the ODMS . Upon logging into the app your roster changes will automatically sync down. If you were logged into the app when you made the roster changes within the ODMS then tap on the sync icon in the top right corner of the Student Profile screen and tap on Sync Students down to iPad in the dropdown menu. You cannot add a class from the app interface.
Deleting Classes
Because of the storage limits on the iPad, all classes and students will disappear from the iPad on July 1st (in the Northern Hemisphere) or January 1st (in the Southern Hemisphere) following the applicable school year. The data does remain in the ODMS.
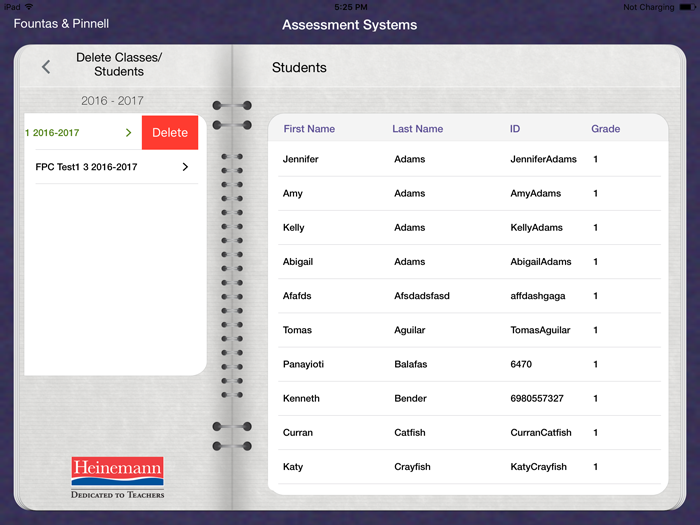
To delete a class from the iPad app before the end of the year, select the Delete Students/Classes area from the cog symbol dropdown menu. Then swipe across the name of the class from right to left and tap on the Delete button that pops up next to the class name.
Note: Deleting classes from the iPad does not delete them from the ODMS. You must also delete the classes there.
Adding Students
You must add students to a class from the ODMS. Then tap on the sync icon in the top right corner of the Student Profile screen and tap on Sync Students down to iPad in the dropdown menu. You cannot add students from the app interface.
Deleting Students
Because of the storage limits on the iPad, all classes and students will disappear from the iPad on July 1st (in the Northern Hemisphere) or January 1st (in the Southern Hemisphere) following the applicable school year. The data does remain in the ODMS, however.
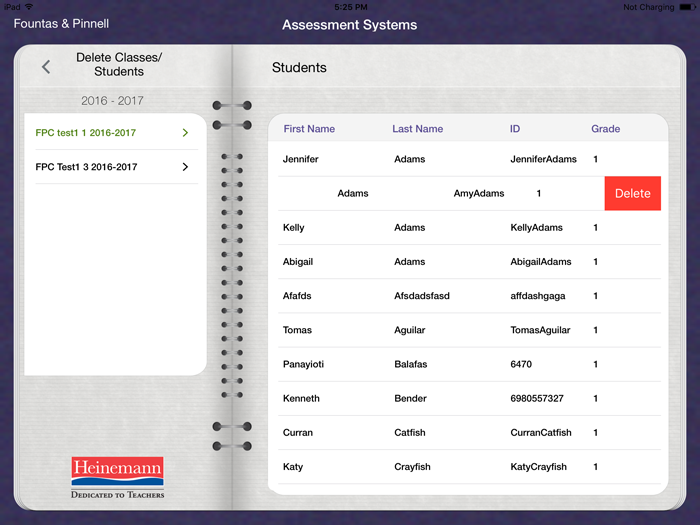
To delete a student from the iPad app before the end of the school year, select the Delete Students/Classes area from the cog symbol dropdown menu. Then select the student. Then swipe across the name of the student from right to left. Tap on the Delete button that pops up next to the name of the student.
Note: Deleting students from the iPad does not delete them from the ODMS. You must also delete the student there.
Inactive Students
If you have changed a student's status to "inactive" in a particular class, upon logging into the app the change will automatically sync to the iPad. If you were logged into the app while making these changes you will need to tap on "Sync Students down to iPad" in the Sync dropdown menu to transfer the inactive status to the app. The student's name will then appear in italics, or if they have no assessments on the app, the name will disappear entirely.
Practicing
We recommend that you practice coding using this app at least a few times before sitting down with a real student. This will allow you to become adept at using the app before having the pressure of keeping up with a student as she reads. You can practice by selecting an existing student in your roster and then trying to copy the coding on some completed reading records that you have on hand, or practice live coding with another teacher reading a text to you. After you practice, you can simply delete the assessments that you have created on both the app and the ODMS.
Beginning an Assessment
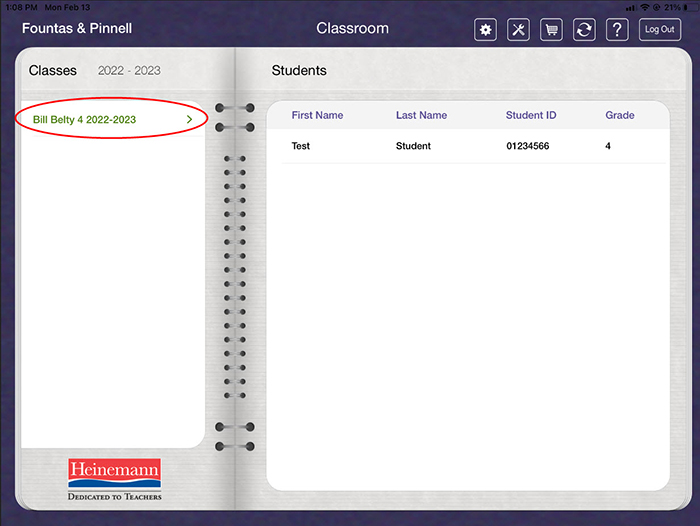
From the Student Profile screen, select a class by tapping on it and then select a student to assess. This takes you to that student's Student Profile/Assessment Data screen.
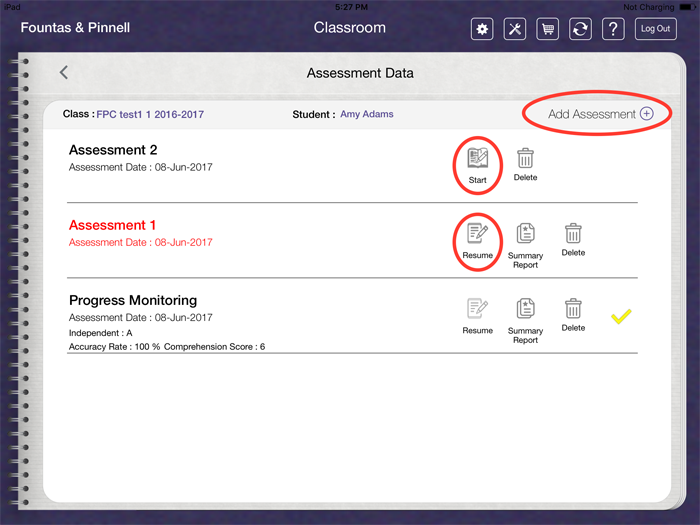
If this is the first assessment for this student that you will do on the iPad, then tap on Add Assessment at the upper right, and tap on Start for the new assessment as soon as it appears.
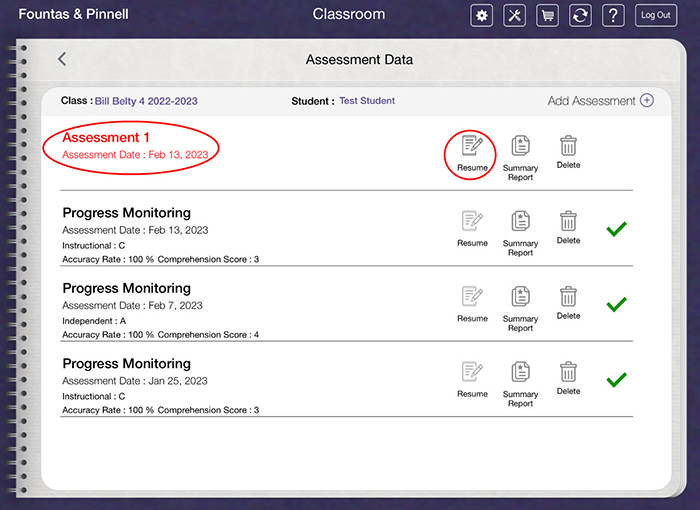
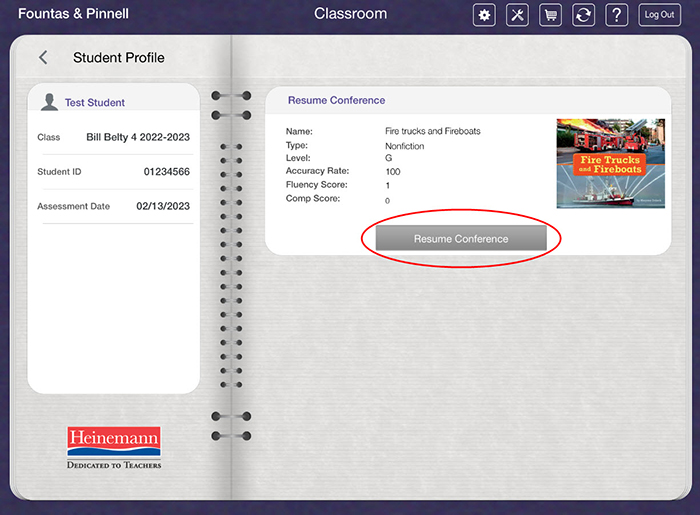
If you are continuing an assessment that already has one or more text readings in it, then tap on Resume for that assessment.
If you have selected the wrong class, you can simply tap on Classes at the upper left to return to the list of classes.
Ending an Assessment
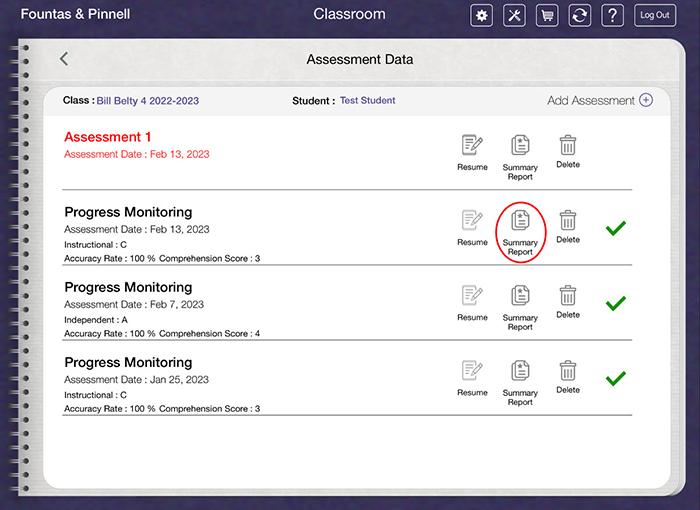
Once an assessment has been ended by tapping on Done on the Student Profile screen, the assessment is categorized as a Progress Monitoring assessment.
Assessments that have unfinished reading records in them will show up in red on the Student Profile Screen, as will the name of the student who has unfinished reading records.

Assessment Summary Report
To access the Summary Report, you will need to be on the Student Profile screen and click on the Summary Report icon for the Progress Monitoring you completed.
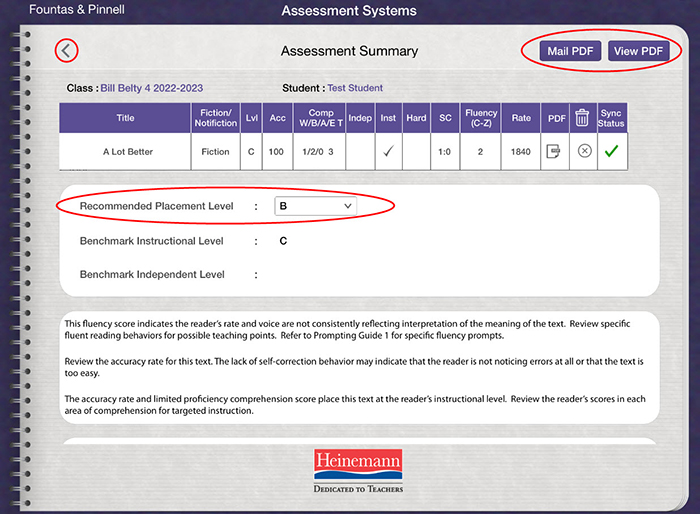
This report lists the title and all the parts of the Assessment Conference and tells whether it was Fiction or Nonfiction. It gives the book level (A-Z), the Accuracy Rate, and the Comprehension Score, and it indicates whether the reading level was independent, instructional, or hard. It also gives the self-correction score, the fluency score, the reading rate, and the writing about reading score and allows you to open the PDF of the reading. It then notes the highest independent level read and the highest instructional level read.
You may indicate a Recommended Placement Level for the student by tapping on that text field and selecting a level (you can scroll through the levels). This data moves to the ODMS when you sync.
The app provides some summary statements about the student's reading of the instructional text that can help you to prepare for further instruction.
You can take notes on a child's reading conference by tapping on the Notes text field, under the summary statements, which brings up a keyboard. Tap on Save when you have completed your notes.
The Assessment Summary report is also available as a PDF that you can open by tapping on View PDF. The PDF will open in your native PDF reader on the iPad. To email the PDF to yourself, tap on Mail PDF. Tap on Back to return to the reading record app.
Selecting a Book
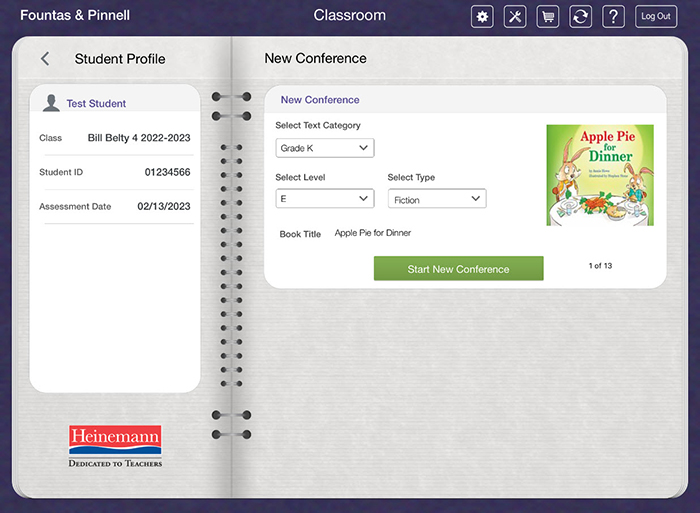
On the New Conference screen, you first select the Text Category (FPC GR grade level).
You then tap on the field for Level to select the text level for the book. The levels are scrollable.
You tap on Type to select Fiction or Nonfiction. If you are choosing a text and there is more than one text available for you at that level, you can swipe across the book cover that has appeared to get to the other book cover(s). Once the book you wish to use has its cover showing and its title appearing in the title field, you can tap on Start New Conference to continue to the introduction screen.
Reading the Introduction
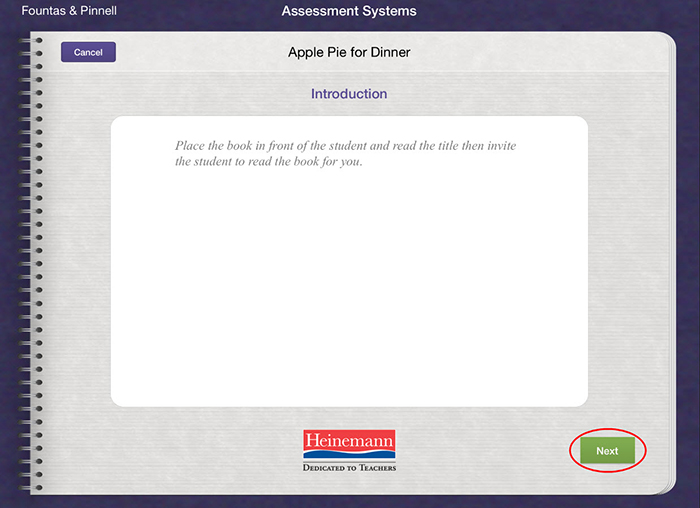
Once you have chosen a Fountas & Pinnell Classroom™ text, the introduction screen appears. Before the child reads the book, you read the title and the introduction to the child. Then tap on Next.
Coding a Reading Record
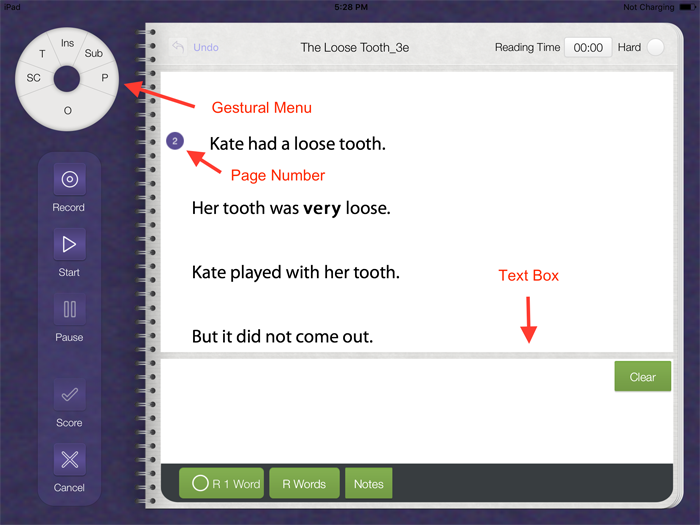
The text of any book will appear on screen. Page numbers are on the left. To code a behavior, you will tap your stylus on a word to highlight it and then quickly move the stylus in a direction as indicated by the gestural menu in the upper left of the screen to indicate a behavior. If you wish to write what the child said or did and have this appear above any typed words, first write the word(s) or behaviors into the text box at the bottom of the screen and then select the typed word with your stylus and make the appropriate directional gesture. Then whatever you wrote into the text box will appear above the word and the behavior is noted. See the Coding Behaviors section below for more specific information.
The program keeps track of the total numbers of errors, self-corrections, and the total reading time as well as creating a recording of the reading if selected.
The Left Toolbar
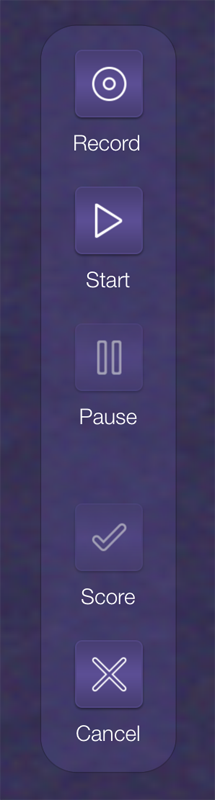
Audio Recording
If you wish to record the child's reading, tap on the Record button in the left toolbar at any time and it will begin recording at that point. After the recording has begun, the Start/End and Pause/Resume buttons control the recording (as well as controlling the timer that determines reading rate). You can tap on the Record button before you tap on the Start button. The Start button will then activate the recording.
Start/End
The Start/End button in the left toolbar starts a recording and also starts the reading time indicator (which determines reading rate). It alternates from being a Start button and an End button. End stops the timer and the recording, but you can still do some coding after that.
Note: You cannot activate the Score button to progress to the scoring section without activating both the Start and End buttons.
Pause/Resume
This button pauses the recording and the timer and then resumes these functions when re-tapped. Use this button if you are interrupted during an assessment or if you need to ask the child to pause so that you can catch up with coding.
Score
The Score button takes you to the scoring/analyzing section. It remains inoperable until the End button has been activated. This button takes you first to the Fluency Scoring screen.
Cancel
The Cancel button cancels this assessment and takes you back to the New Conference screen to select another book.
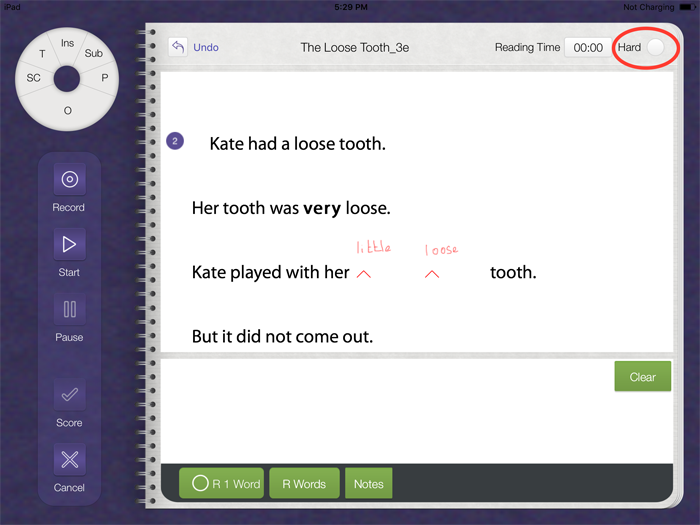
When a Reading Is Hard
In the upper right corner of the coding screen a Hard button will flash when the child has reached the number of errors that constitute a hard book (without taking into account the comprehension score), so for Levels A-K, the Hard button will flash when the child has an accuracy rate of below 90% and for Levels L-Z, the button will flash when the child has a rate below 95%.
When the Hard button flashes, you can choose whether to end the assessment and count the reading as a hard reading or to go on and finish the assessment. If you choose to end it, you simply tap on the Hard button, and you are then taken to the Assessment Report. Of course there will be no Fluency or Comprehension score showing in the report in this case, nor will there be a graph showing MSV analysis figures.
Coding Behaviors
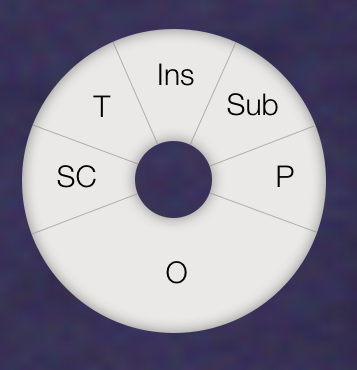
Insertions
A student may insert words into the reading that do not exist in the text. First write the inserted word or words into the text box. Then tap on the typed word before the insertion occurred and quickly swipe up, to match the direction of Ins on the gestural menu. The inserted word will then appear after the word you selected. The caret symbol (^) is used to indicate inserted words.
If a student inserts multiple words between two words in the text, you write each additional word separately in the text box and tap and swipe on the previous word again for each extra word in order to count it in the error count.
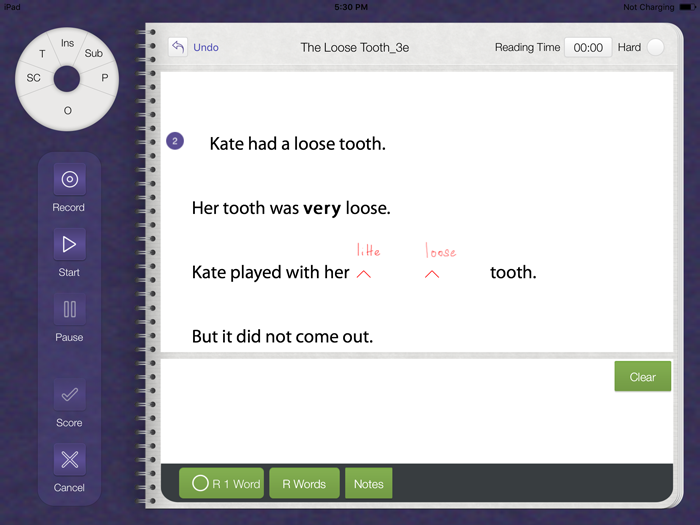
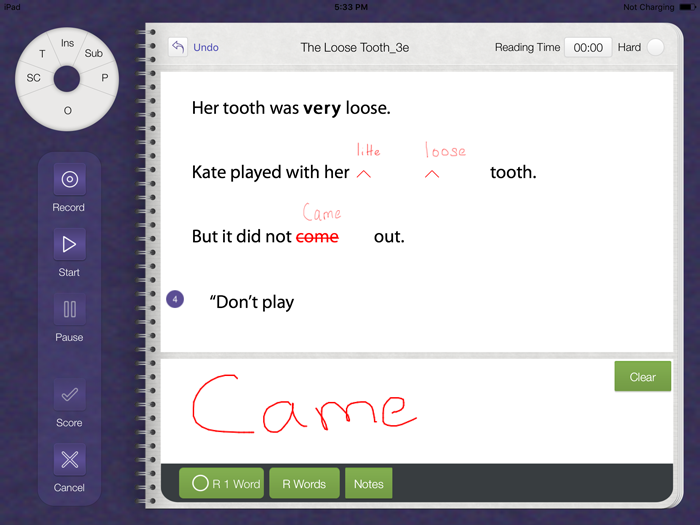
Substitutions
Sub on the gestural menu is used to indicate a substitution of a wrong word (or words) for one word in the text. A child may try several words while trying to determine the correct word. Write the word(s) the child says in the text box and tap on the typed word and quickly swipe in the direction indicated by Sub on the gestural menu. The typed word will turn red and the handwritten word(s) will appear above it. Each word in the text that has a word or words substituted for it counts as one error.
Note: If a student substitutes a contraction for two words, this should only count as one error. To indicate this behavior, write the contraction and tap and swipe on the first word. Then tap on the second word and swipe down towards the O, which stands for Omit. You can take the error count off of the omission in the analysis section.
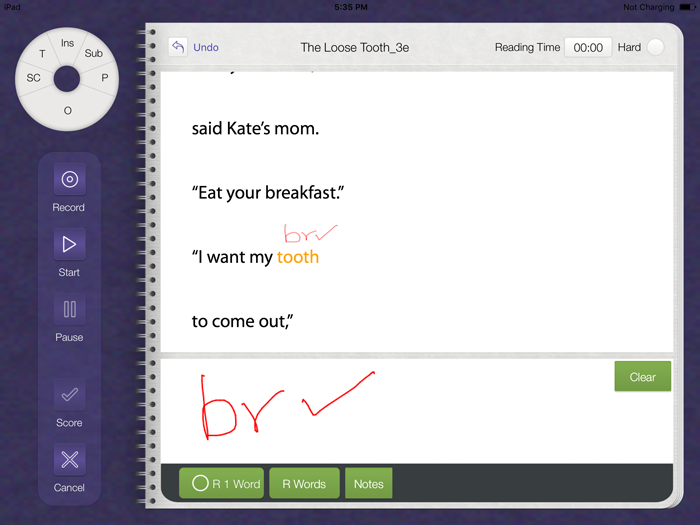
Processing
The P on the gestural menu is used to indicate the processing of a word by sounding it out, but not a substitution. In this instance, you write down how the child processed the word in the text box and then tap on the typed word and quickly swipe to the right. This turns the typed word in the text orange and puts your writing above the word. This does not count as an error.
Omissions
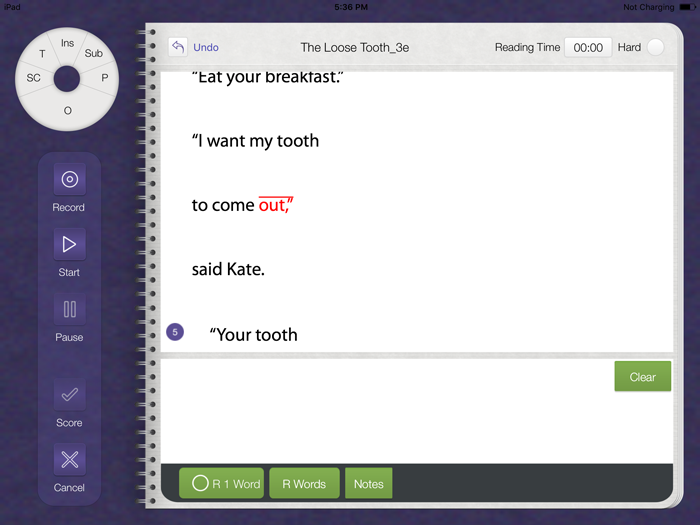
The O on the gestural menu is used to indicate a word that was omitted in the reading. Tap on the omitted word and quickly swipe down, and the word will appear red with a red line over it. Each omitted word will count as one error.
Self-Corrections
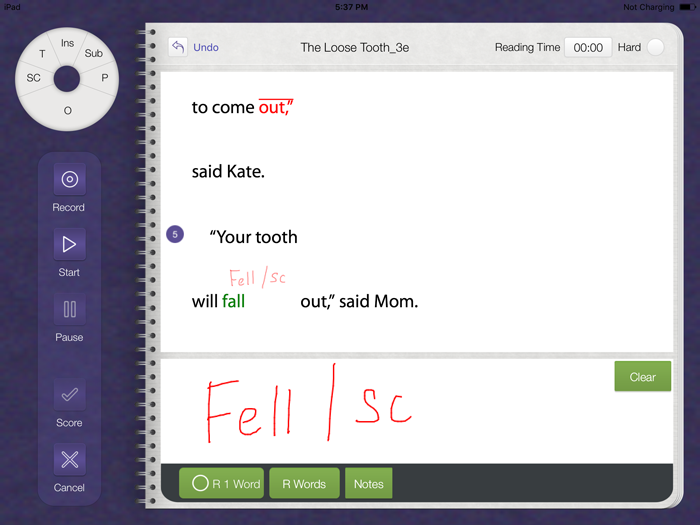
If a child self-corrects after saying the wrong word, then write the substitution followed by "/SC" into the text box before quickly swiping to the left. (You do not need to swipe to indicate the substitution first.) The typed word then becomes green and what you've written in the text box appears above it. Each self-correction is counted, and the original error on that word is not counted as an error. If you swipe for the substitution before hearing the self-correction, retap on the typed word to bring up what you originally wrote into the text box and then continue writing "/SC" in the text box before swiping to the left.
See the Repetitions section below for information on what to do when behaviors are self-corrected on a repetition of a phrase.
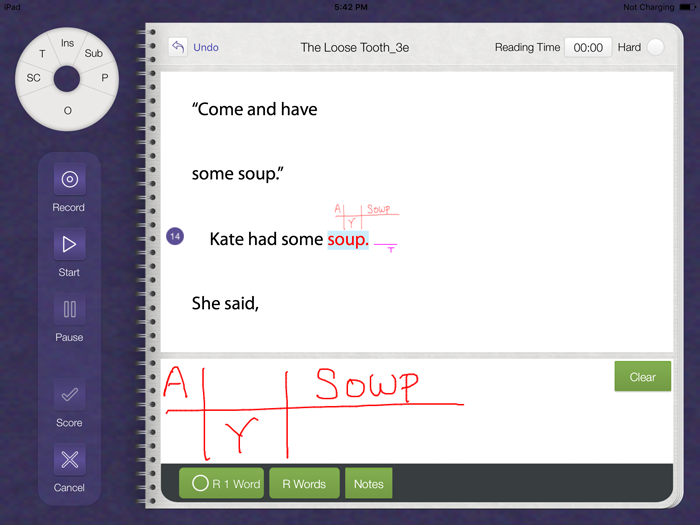
Appeal and You Try It
If a child asks you for help with a word, indicate this by writing A into the text box with a line under it. If the child has not tried the word before making the appeal, or if the child stares silently at a word, say to the child, "You try it." Indicate that you have said this by writing Y with a line above it. Then wait to see what the final behavior is and indicate that in the text box and tap the word and swipe in the direction of the final behavior, which may be P for processing or Sub for substitution.
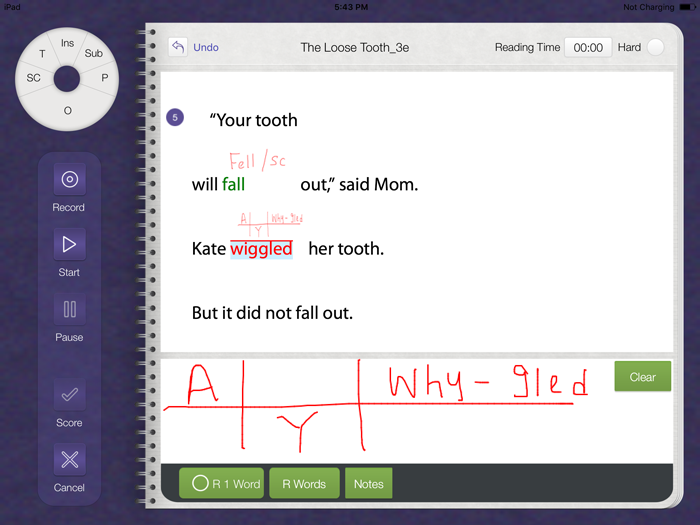
Told
If you tell a child the word after you have asked the child to try it or after a child has struggled with a word and cannot move on, indicate this by tapping on the word and swiping in the direction of the T on the gestural menu. A T then appears next to the word, underneath a line, and the word turns red. This is an error in the error count.
This screenshot shows how the screen would look if a child appealed, and a teacher then said, "You try it." Then the child substituted a word and the teacher told the word to the child. In this instance the "A/Y/sowp " was written and the user tapped on the word and swiped in the direction of the T.
Repetitions
You indicate a repetition of one word by selecting the word and tapping on R 1 Word. This puts a line over the word with an arrow pointing down to the beginning of the word. If the word is repeated more than once, continue to tap on the R 1 Word button and the number 2, then 3, then 4, etc., will appear at the end of the line. Please note that a repetition is not an error.
To indicate the repetition of more than one word, tap on the first or last word in the repeated phrase, then tap on R Words. Then tap on the word at the other end of the repeated phrase and tap on R Words again. If the phrase is repeated more than once, repeat the process.
If you wish to change an R3 to an R2, tap on Undo in the upper left corner and the number will go down.
To indicate when behaviors have happened during a repetition of a phrase, use the text box and draw an arrow down next to the behavior that occurred during a repetition. See the screenshot below for an example. If there is a new behavior on a word that had a previous behavior indicated, tap on that word before writing into the text box so that you can add to what was originally written rather than overwriting it.

When a repetition happens inside the scope of another repetition, the app changes the color of the repetition line. To help you determine the order in which the repetitions happen, the app uses the following line colors in this order: Pink, blue, red, gray, yellow.

Notes
You can embed a note in the text at any point by tapping on a word, writing in the text box, and tapping on Notes. These notes will be viewable on the PDF of the reading record.
Clear
The Clear button clears the text box of any words.
Undo
Undo, in the upper left corner of the coding screen, undoes each noted behavior starting with the most recent.
Ending the Coding Section of an Assessment
Tap on End on the left navigation bar to end an assessment. Then tap on Score to move to the scoring and analyzing section.
Scoring and Analyzing
In this section of the app, you will score Fluency (recommended only for levels C and above) and also the child's comprehension of the text. If applicable, you will score the Writing about Reading that the child has done. (Writing about Reading is optional and is ideally done only for the instructional-level text.)
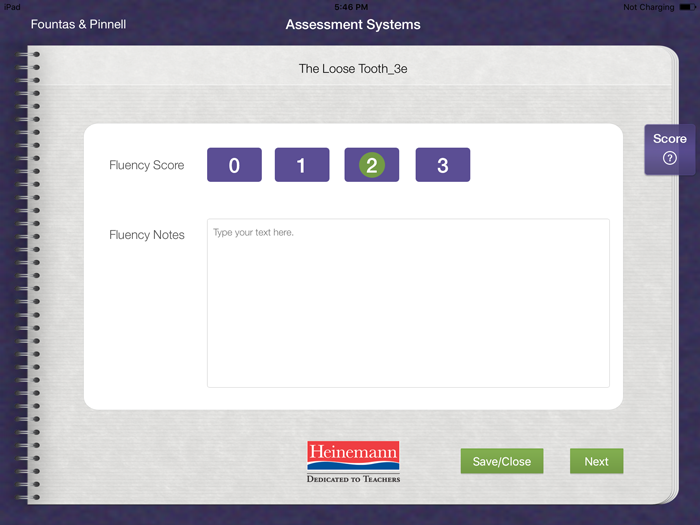
Scoring Fluency
This screen allows you to assess the fluency of the reader and to make notes on the reader's fluency.
Choose from scores of 0, 1, 2, and 3. There is a key on this screen to help you score (tap on the ? button). Tap on Next to continue on to the Comprehension Conversation Scoring section.
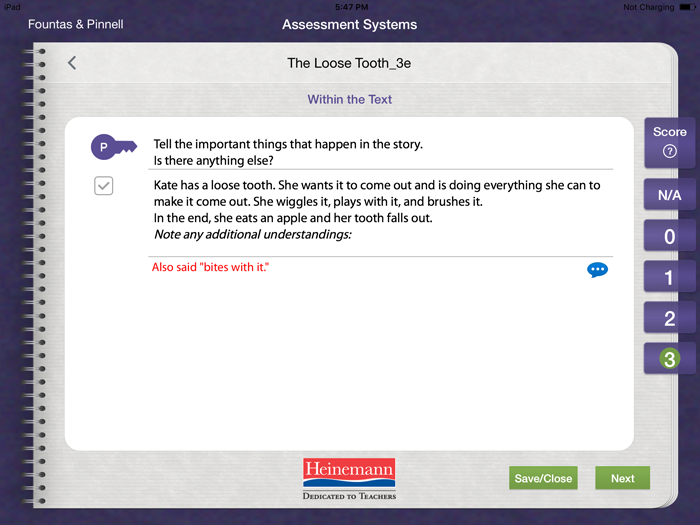
Scoring the Comprehension Conversation
The Comprehension Conversation screens show prompts with key understandings underneath them. Begin by asking the child what happened in the story. Then look at the key understandings as a whole to see which ones the child mentions. The prompts are there to help you elicit understandings that have not yet been mentioned. You don't need to ask each prompt if the child has already given that information.
Tap on the checkmark next to the key understandings that were fully voiced and use the comment feature to note any additional understandings or partial understandings that the student demonstrated.
To comment, tap on the speech balloon under the key understanding and type into the text field that pops up. Tap on Save when you have finished typing.
The Comprehension Conversation can have 2 or 3 categories of questions ("Within the Text," "Beyond the Text," and "About the Text") depending on the book level. For levels A-K, there are only two categories of questions: "Within the Text" and "Beyond and About the Text." Tapping on Next takes you to the next set of questions.
On the right side of the screen for each category of questions is a scoring toolbar. It has a pop-up key and also scores of 0, 1, 2, and 3 to choose from. If you are using BAS 2nd Edition texts, then the final category of questions has an extra point that you can award a student. Once you have scored the final screen, you are taken to the Writing about Reading Prompt.
If you wish to continue the scoring and analysis section at a later time, you can tap on Save/Close in the lower right corner of the screen to save and close this assessment for later retrieval.
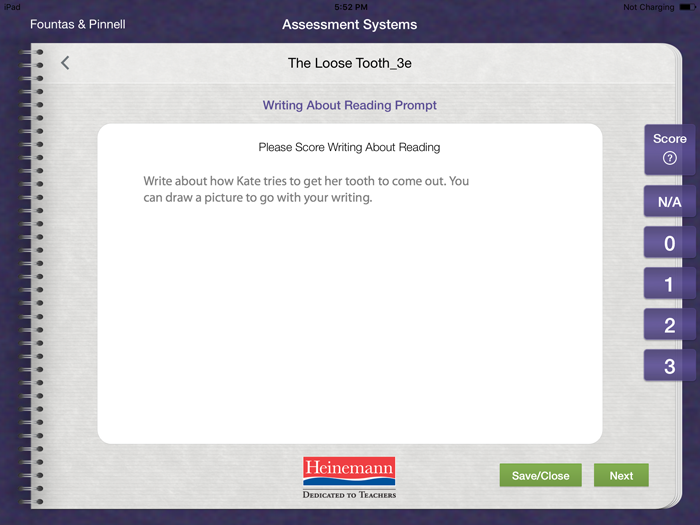
Writing about Reading Prompt
There is a prompt listed on the Writing about Reading screen that you may read to your students if you would like additional evidence of their understanding. See your BAS/SEL Assessment Guide for more information on implementing this part of the assessment. Tapping on the Next button takes you to the Analyzing screen.

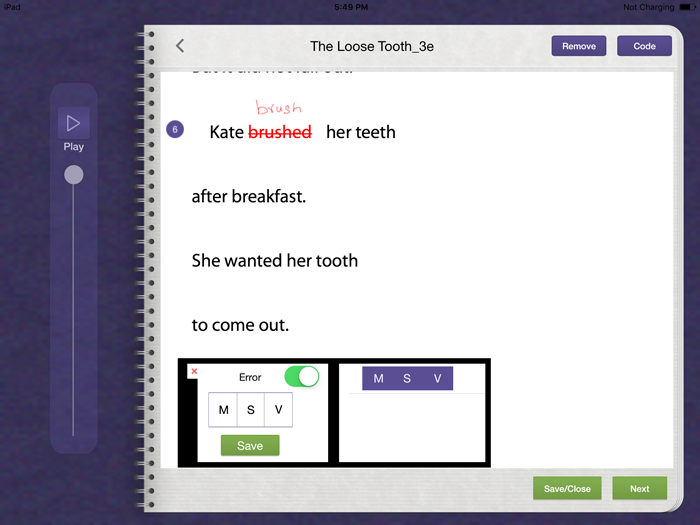
Analyzing Behaviors
In this section of the app you look at each error (except omissions and insertions, which are not analyzed) and each self-correction, and you analyze why the child behaved as they did. Was it based on meaning (M), language structure (S), or visual features (V)?
You can also play the audio of an error by clicking on the Play button on the left of the screen and moving the indicator to find the applicable place in the text.
Scan the text for any words that are colored Red or Green. These are the errors and self-corrections. To analyze an error, select the word in the text by tapping on it to highlight it. The box in the lower part of the screen will give you the ability to turn the error Off (not counting it as an error) and also the ability to analyze the error. Note: You should turn the error indicator to Off for all errors involving proper nouns after the first instance. And it should also be turned of for any omission that you marked for the second word when a contraction was substituted for two words.
To analyze the error, tap on the M, S, or V (or combination of them) in the box. Then tap on Save.
If you have more than one substituted word to analyze for a single typed word in the text, continue tapping on M, S, or V and then on Save. A line is then added that shows your selection(s). You can add up to six lines.
Tapping on any line will bring it back to the first box where you can change your choices. Slide your finger from left to right along a line to delete it entirely.
Analyze self-corrections in the same way. You should still analyze the errors for MSV, however. The errors just don't count in the overall error tally.

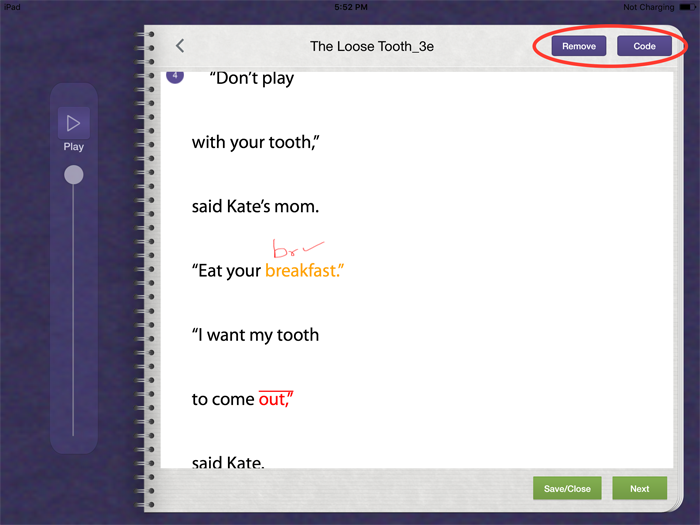
The Code/Analyze button on the upper right toggles you between the screen where you can code behaviors and the screen where you can analyze them. This is so that if you hear a mistake in audio playback that you didn't code, you can go back and code it. All work on either type of screen (coding or analyzing) is saved when you click on the button to go to the other screen.
Use the Remove button to undo any noted behavior. Tap on the word with the behavior. Then tap on Remove.
When you tap on the Next button, you go to the screen where you can score the writing about reading.
Scoring Writing about Reading
This screen has the Writing About Reading Prompt on it and the scoring options of N/A, 0, 1, 2, 3 and also a key. Choose N/A if you did not ask the child to complete the Writing about Reading assignment.
The Next button takes you to the Summary Statement for this assessment.
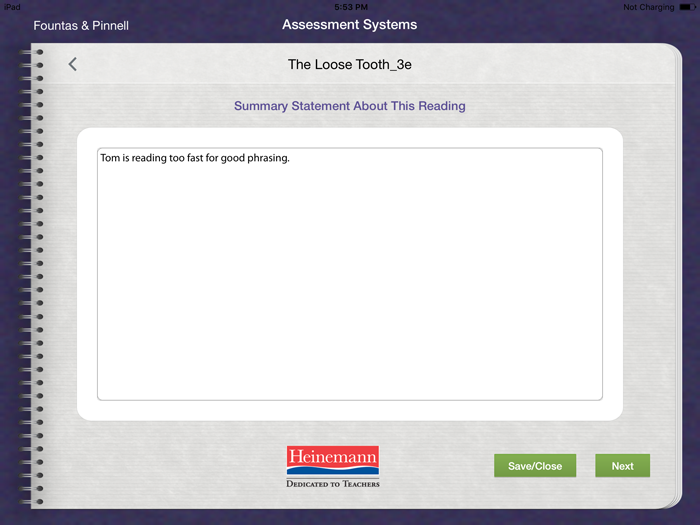
Summary Statement
This screen allows you to write a summary statement about this reading. Tap into the text box to bring up the keyboard to type your statement. Then tap on Next to go to the Assessment Report.
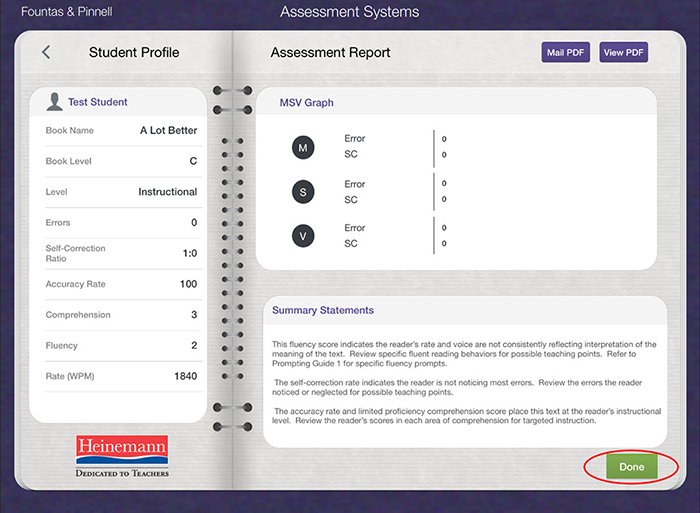
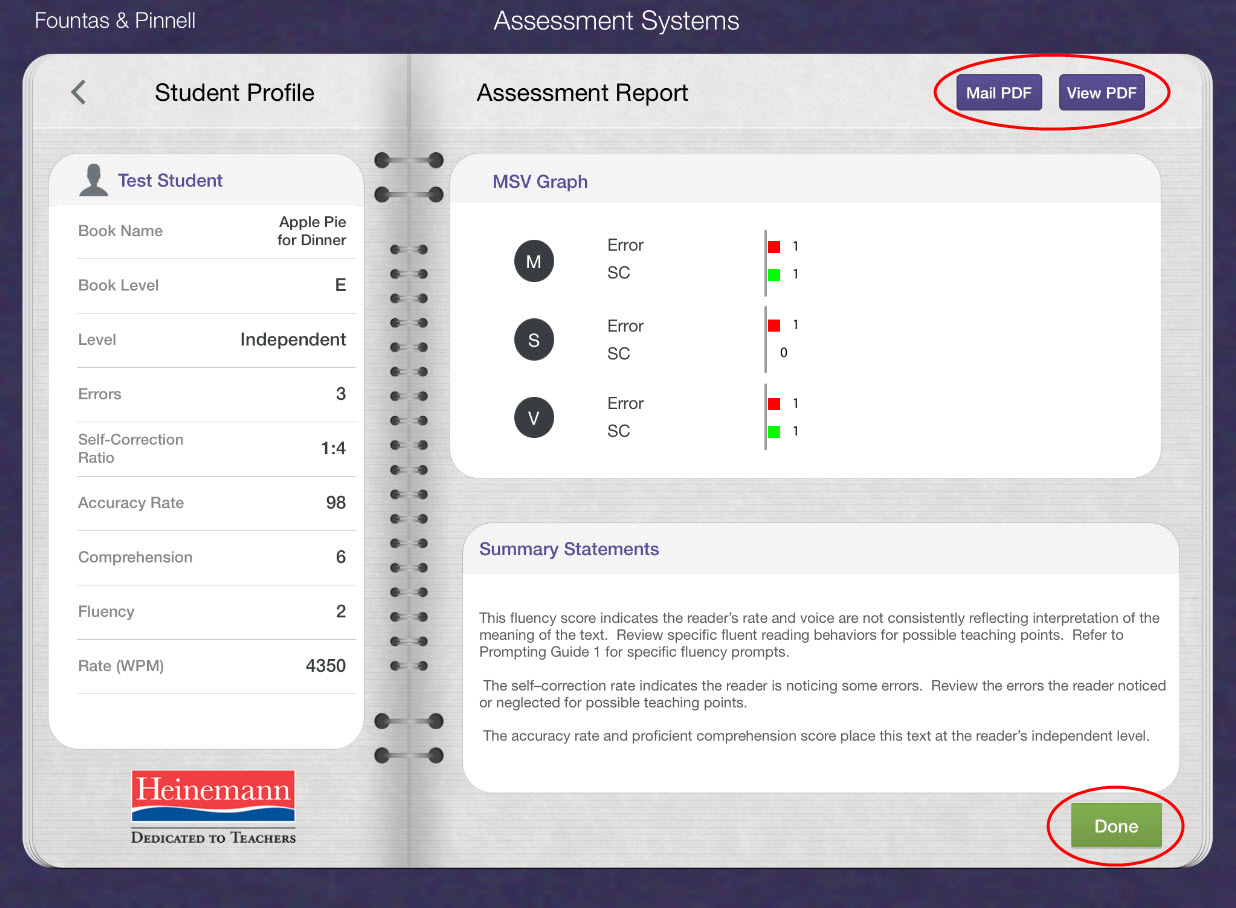
Assessment Report
This screen shows all of the data about the reading that has just been coded, scored, and analyzed. The data shown are Book Title, Reading Rate, Accuracy Rate, Self-Correction Ratio, Number of Errors, Number of Self-Corrections, Fluency Score, Comprehension Score, Difficulty Level, and Writing About Reading Score.
A graph shows the numbers of Errors and Self Corrections, split up by those analyzed to be M, S, or V.
Three summary statements will also appear that are based on the reading assessment data and that will help you move toward next steps for instruction for this student.
You can tap on Mail PDF to email the recording form to yourself.
You can tap on the View PDF button to open a PDF of the reading record in your native PDF viewer. From here you can choose to print it (by tapping on the symbol in the upper right corner) or to open it in another app. Then you can return to the app by tapping on the upper part of the screen and then tapping on Done. The PDF will travel to the ODMS (if you are a subscriber) when you sync and will also be accessible from the Student Summary Report.
The Done button on the Assessment Report allows you to go back to the Student Profile screen.
Continuing an Unfinished Assessment
If you saved some of the assessments in a conference without finishing the scoring or analyzing, you can return to those assessments (which will appear in red) to finish them by tapping on the Resume button for the applicable assessment conference on the Student Profile screen. All unfinished assessments are selectable at the bottom of the Conference screen. If there are several, simply swipe the book cover to see the other choices. Keep the number of unfinished assessments to a minimum to avoid potential loss of data. The RRA limits the number of incomplete assessments a teacher can have on the iPad and will not allow the teacher to begin new assessments until the incomplete assessments have been finished.
Syncing to the ODMS
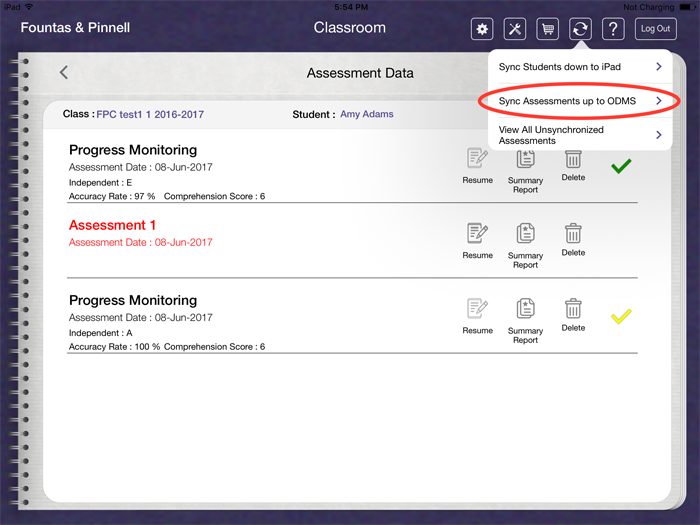
If you have wireless connectivity, the app will sync to the ODMS when you log in and also after each assessment has been completed, but if you are working where there is no wireless access, you will need to sync at a later time. To transfer your assessment data from the iPad to the ODMS, tap on the sync icon and select Sync Assessments up to ODMS. It is a good idea to sync often so that data is backed up. All assessments completed since the last transfer will have a red X next to them. Those with a green checkmark have been successfully transferred. Any assessments with a yellow checkmark have had their data manually entered into the ODMS by you, and you will have indicated this via the Unsynchronized Assessments screen (see below).
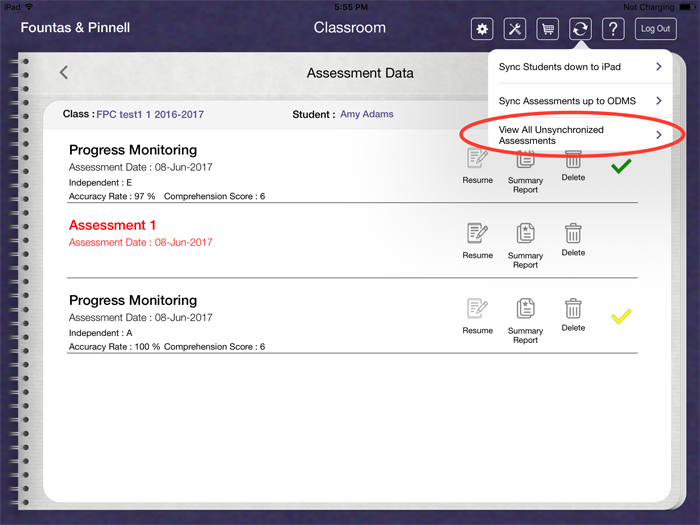
All assessments that are unable to be sent to the ODMS for any reason can be viewed by tapping on the sync icon at the top of the Student Profile screen and then tapping on View All Unsynchronized Assessments.
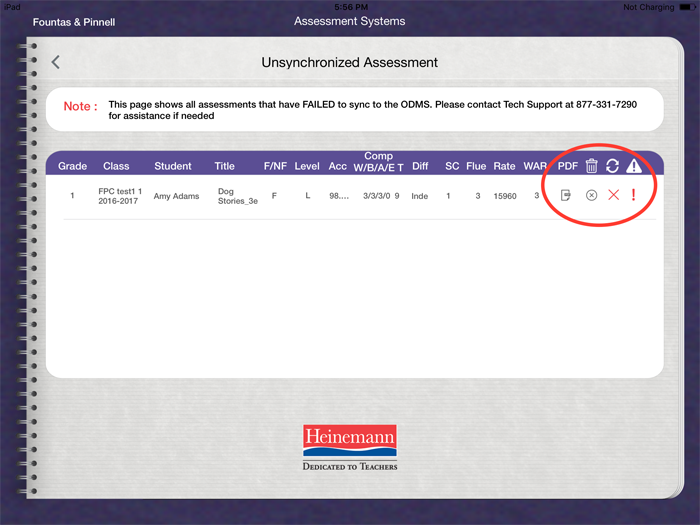
This brings up a screen that shows the data for the unsynchronized assessments in case you need to manually enter the data into the ODMS. Here you can also access the PDF of the reading record. The sync problem for each assessment can be viewed by tapping on the Exclamation Point in the last column. If the sync issue cannot be resolved and you manually enter the data into the ODMS, you can change the sync status for an assessment to a yellow checkmark by tapping on the X in the second-to-last column and then answering Yes. You can also delete the assessment, if you wish, by tapping into the Trashcan column.
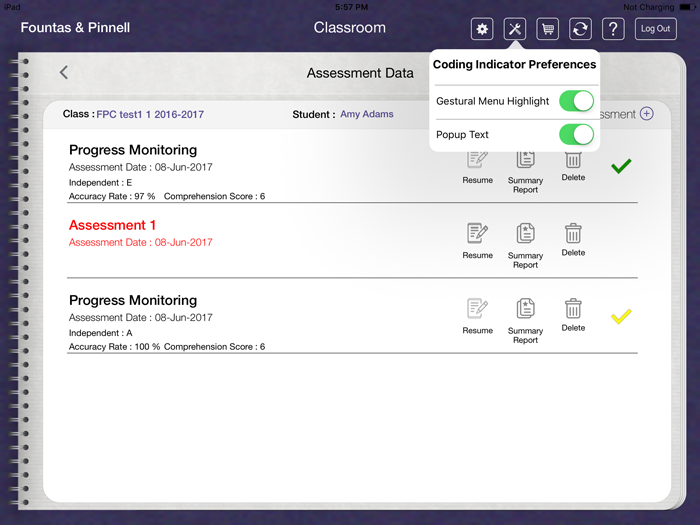
Changing Coding Indicator Preferences
If you no longer wish to see the highlight (the blue dot) appearing on the gestural menu to confirm a swipe direction, you may turn that functionality off. Similarly, you may turn off the popup text that also confirms your directional selection. To turn these functionalities off, tap on the wrench symbol at the top of the Student Profile screen.